In this simple to follow Here’s How to guide, we outline in a step by step method how you can make your Fable & Guild 3D Multi-Layered Cut File.
All Fable & Guild’s 3D multi-layered cut file digital download files include the following file types: SVG, PNG, JPG, PNG, EPS and PDF. Consequently they are compatible with your Cricut, ScanNcut, Silhouette, CNC or most other cutting machines. Basically the following how-to visual guidance notes of “Here’s How to make your 3D multi-layered cut file” outline how to make your cut file art.

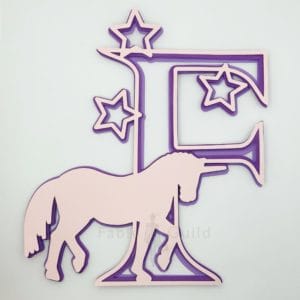
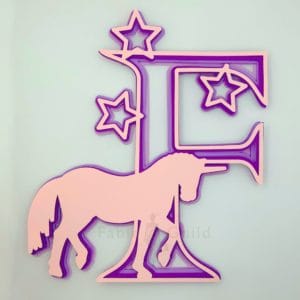
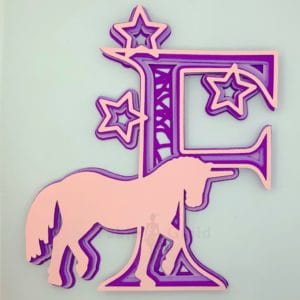
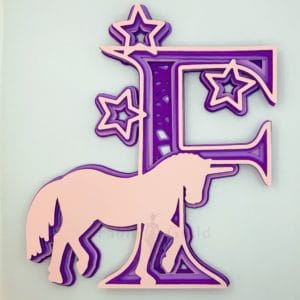
In this example we show you how to build “Star the Unicorn – Alphabet Letter F ” from Fable & Guild’s Alphabet Suite Collection.
The following instructions are suitable for all Fable & Guild’s 3D multi layered cut files.
Make your 3D Multi-Layered Cut File Detailed Instructions
First of all you will need to locate your 3D multi-layered cut files file that you have downloaded onto your desktop and unzip the zip file. In our example, we are using F.StarUnicorn-6a-Alph.FableandGuild.zip.
This example download F.StarUnicorn-6a-Alph.FableandGuild.zip file contains the following 3 folders:-
- JPG.EPS.F.StarUnicorn-6a-Alph.FableandGuild
- PNG.DXF.F.StarUnicorn-6a-Alph.FableandGuild
- PNG.DXF.F.StarUnicorn-6a-Alph.FableandGuild
Secondly, locate the file type that you wish to use (SVG or PNG, etc.) in one of the 3 folders provided in the zip file.
In our example for Star the Unicorn – Alphabet Letter F we are using the SVG files.
Step 1. File Selection
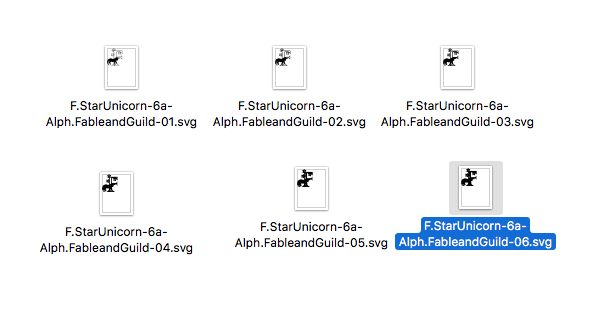
Tip: Each file is one single layer and all files are numbered accordingly, i.e. File 01 = Layer 1 (the upper most layer).
Tip: Save each file according to its numbered layer as you upload your layered files to your cutting machine art board. Please note that the highlighted file in the image has a filename “06” suffix, which indicates it is layer 6 in this example.
Consequently in the Star the Unicorn – Alphabet Letter F artwork example, we have 6 layers to cut (6 files with suffixes 01 -06).
Important: Once all your files are uploaded on to your cutting machine art board, select all of your files and align them both horizontally and vertically. Then whilst all files remain selected, resize to your required size and cut your files.
Step 2. Select the first layer

Here are the 6 cut file layers that make up Star the Unicorn – Alphabet Letter F.
Tip: Start with layer 1 (the file name with the “01” suffix, which is the top/uppermost layer).
Step 3. Select your desired 3D effect
There are two methods to create a layered 3D effect with your cut files:
Method 1
To visually see the difference between these methods, please refer to our Here’s How to foam dot or not! guide.
You will need:
- Double sided foam tape or sticky dots.
- Pair of sharp scissors.
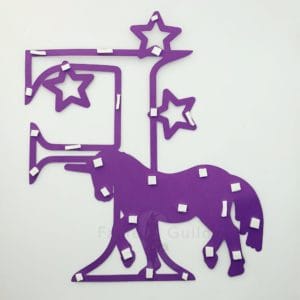
Evenly distribute double sided foam tape or sticky dots on to the reverse side of each layer, excluding the last layer (layer 6 in this example).
Tip: If layer one has narrow detail or the scale you are working to is on the smaller side then layer one can be glued/placed directly on top of layer two.
Tip: The image shows the underside of the letter F and the placement of the double sided foam tape or sticky dots.
Tip: Be sure to position the double sided foam tape or sticky dots where they will not be seen from the upper side.
Once all your foam tape or sticky dots are in place, turn over your layer and position the underside of layer 1 on top of the upper side of layer 2.
Tip: Be sure to position the layer centrally and evenly.
Proceed to Step 4.
Method 2
To visually see the difference between these methods, please refer to our Here’s How to foam dot or not! guide.
You will need:
- Glue or spray adhesive
Instead of using double sided foam tape or sticky dots, your layered cut files can be simply glued directly one layer on top of the other.
Tip: The result is not as 3D, but can be equally as effective!
Step 4. Repeat adhesive choice for each layer
Now repeat the process outlined in Step 3 above for each of your layers until your last layer (in our example, this is layer 6).
Step 5. Stick Layer 1 onto layer 2
Now select the cut layer 1 with the your choice of adhesive method on the back. Then position it on top of layer 2.
Step 6. Stick joined layers onto layer 3
Layers 1 & 2 positioned on top of layer 3
Step 7. Stick joined layers onto layer 4
Layers 1, 2 & 3 positioned on top of layer 4
Step 8. Stick joined layers onto layer 5
Layers 1, 2, 3 & 4 positioned on top of layer 5.
Step 9. Stick joined layers onto layer 6
Also layers 1, 2, 3, 4 & 5 positioned on top of layer 6.
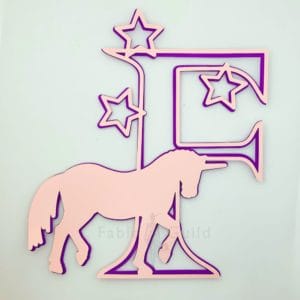
Step 10. Completed!
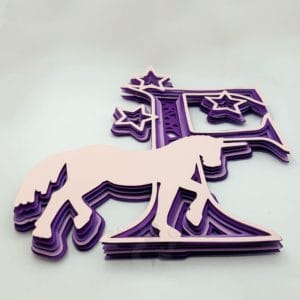
Congratulations, your 3D multi-layered cut file art work is now complete.
Check us out on Facebook
- Please give us a Like and Follow us on Facebook
- Join our Cricut ScanNCut Silhouette SVG Help & Show Off Facebook Group created to ask questions & show off all your SVG art work created by you and your Cricut, ScanNCut & Silhouette cutting machines – let’s get creative and let’s celebrate getting creative!
- Like what you see, then please Share our Here’s how to make your 3D Multi-Layered Cut File on Facebook.
More 3D multi-layered cut file art to inspire you…
Ideal for more 3D multi-layered cut files projects. Please see below our latest 3D SVG cutting file designs below.
-
")
The Bugle Messenger (A PDF Knitting Pattern For Bag Purse Handbag)
US$6.96 Exc. Tax Add to cart -
The Cute Constance – A PDF Pattern For A Messenger Bag
US$6.96 Exc. Tax Add to cart -
The Mini Lucy (PDF Tote Bag Sewing Patterns)
US$6.96 Exc. Tax Add to cart -
The Adele Baguette – A PDF Handbag Patterns To Sew
US$6.96 Exc. Tax Add to cart
")
")


")
")